Translate

A apresentar mensagens correspondentes à consulta spybotics ordenadas por relevância. Ordenar por data Mostrar todas as mensagens

domingo, 5 de abril de 2020

Spybotics - Um robot singular e versátil - 3806/3807/3808/3809

LEGO® Spybotics , ou melhor, os conjuntos


LEGO® Spybotics, or rather, the sets


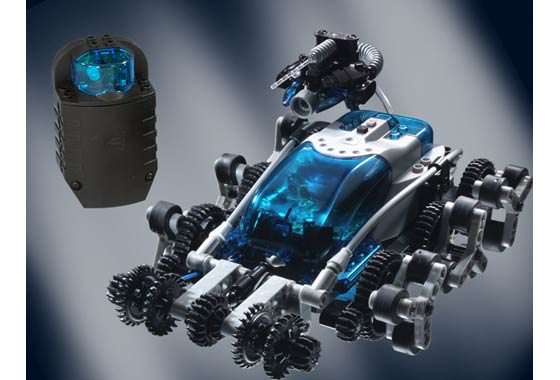
Lançados todos em 2002, e conhecidos respetivamente como o azul, o vermelho, o violeta e o verde são uns robots de uma serie da LEGO® que durante muitos anos ( e acredito que ainda agora, pois eu ainda os uso aos quatro) entretiveram jovens e não tão jovens, durante horas e horas. Sendo vendidos com um CR-ROM (único para os 4, ver mais abaixo o link) eram programados através de um cabo ligado a uma porta COM o qual comunicava com os robots através de emissão de raios de luz visível. Estes robots eram programados de diversos modos, e podiam até interagir uns com os outros nos seus movimentos, bem como interagiam com o RCX 2.0. Possuíam dois motores integrados e sensor de toque. Emitiam feixes de luz, os quais eram direcionados através de cabos de fibra ótica, os quais ao "curvarem" a luz produziam efeitos luminosos muito apelativos. Uma vez programados podiam ser controlados por um comando remoto o qual, embora internamente igual, possuía a cor transparente do robot que controlavam. 
No CD_ROM apelava-se a desafios de espionagem a nível mundial, pré-orientados, com tempo específico para a sua realização. Estes desafios poderiam ser realizados com um ou em pares de spybotics. Por fim havia a possibilidade de realizar as nossas próprias missões, e as partilhar online (na altura) que poderiam incluir mais de que um spybotics... enfim um mundo robótico aliado ao mundo lúdico do jogo.

All launched in 2002, and known respectively as blue, red, violet and green, they are robots from a LEGO® series that for many years (and I believe that even now, as I still use them at four) entertained young people and not so young, for hours and hours. Being sold with a CR-ROM (only for the 4, see the link below) they were programmed through a cable connected to a COM port which communicated with the robots through the emission of visible light rays. These robots were programmed in different ways, and could even interact with each other in their movements, as well as interacting with RCX 2.0. They had two integrated motors and a touch sensor. They emitted beams of light, which were directed through fiber optic cables, which when "bending" the light produced very appealing light effects. Once programmed, they could be controlled by a remote control which, although internally equal, had the transparent color of the robot they controlled.
The CD_ROM called for espionage challenges worldwide, pre-oriented, with specific time for their realization. These challenges could be accomplished with one or in pairs of spybotics. Finally, there was the possibility to carry out our own missions, and share them online (at the time) that could include more than spybotics ... in short, a robotic world allied to the playful world of the game.


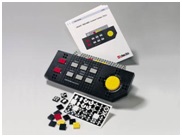
O CD-ROM (clique na imagem para fazer download) 

Estes robots eram vendidos em caixas de cartão e não possuíam instruções de montagem em formato de livro. As instruções encontravam-s no CD-ROM que os acompanhavam, de igual modo ao CyberMaster e ao atuais WeDO. Contudo, e caso tenham dificuldade em colocar um CR-ROM a funcionar (podem fazê-lo através do uso de um programa de leitura de discos virtuais...) podem contudo ver as mesmas neste site (Japonês, por sinal). Cliquem na imagem de cada caixa.

These robots were sold in cardboard boxes and had no assembly instructions in book format. The instructions were on the CD-ROM that accompanied them, as well as the CyberMaster and the WeDO. However, and if you have difficulty getting a CR-ROM to work (you can do it using a program for reading virtual disks ...) you can nevertheless see them on this site (Japanese, by the way). Click on the image of each box.


Foi editado um livro sobre este pbrick e de como otimizar o seu uso.

A book has been published about this pbrick and how to optimize its use.


Os quatro LEGO® Spybotics -  Gigamesh G60, Technojaw T55, Snaptrax S45 e Shadowstrike S70...the meeting.....e em modo automático... uma curiosidade sobre o comportamento autónomo deste robo da LEGO®

Sobre o seu firmware e modo de configuração consulte o Mindstorms SDK 2.5 (clique aqui).


The four LEGO® Spybotics - Gigamesh G60, Technojaw T55, Snaptrax S45 and Shadowstrike S70 ... the meeting ..... and in automatic mode ... a curiosity about the autonomous behavior of this LEGO® robot

About your firmware and configuration mode see the Mindstorms SDK 2.5 (click here).


Um vídeo com os 4 spybotics


Duas fotos do interior do Spybotics


Um video onde se analisa o circuito do Spybotics


(atualizado em 17/10/2024)

quarta-feira, 11 de novembro de 2020

Mindstorms SDK 2.5 - Recursos de programas e muito mais...

Confesso que não estou muito à vontade para vos falar sobre o Mindstorms Software Developer Kit versão 2.5. Contudo não posso deixar de o referenciar com uma página totalmente dedicada a ele, porque ele o merece. Refiro que consoante vou adquirindo maior confiança em estruturar a minha informação sobre o SDK, farei o que faço em qualquer dos meus artigos anteriores, atualizarei a informação.Não confundir o SDK 2.5 com o Scout SDK, já tratado noutro artigo específico sobre o conjunto 9735.

Este pacote de softwares e de documentos, foi liberado pela LEGO no sentido dos programadores contribuírem para a melhoria e otimização dos tijolos programáveis LEGO (PBricks), como RCX, mas sobretudo Scout, Microscout e Spybotics. Segundo o site (https://www.philohome.com/sdk25/sdk25.htm) a LEGO deixou de dar suporte técnico no seu site em 2008.

Por isso, o site de www.philohome.com e outros, continuam a manter online o Software SDK 2.5.

O que é que ele contém (pequena e reduzida referência - do site já referido): 

Contém várias documentações sobre códigos de byte RCX2 e Spybotics e LASM, bem como documentação, bibliotecas e arquivos de cabeçalho para comunicações entre PC e bloco. Também inclui firmware RCX2 (firm0328.lgo) que oferece mais capacidade ao RCX (até mesmo em versões mais antigas). Possui os executáveis VLLtest VCTest e VBTest e a ferramenta ScripEd, a qual possibilita a programação do RCX2, Scout, MicroScout e Spybot.

Contudo como há programadores interessados, aqui fica o link para fazerem download.


I confess that I am not very comfortable talking about the Mindstorms Software Developer Kit version 2.5. However, I can't help but reference him with a page totally dedicated to him, because he deserves it. I mention that as I gain more confidence in structuring my information about the SDK, I will do what I do in any of my previous articles, I will update the information.Do not confuse SDK 2.5 with Scout SDK, already dealt with in another specific article on the set 9735.

This software and document package was released by LEGO in order for programmers to contribute to the improvement and optimization of LEGO programmable bricks (PBricks), such as RCX, but above all Scout, Microscout and Spybotics. According to the website (https://www.philohome.com/sdk25/sdk25.htm) LEGO stopped providing technical support on its website in 2008.

For this reason, the website www.philohome.com and others continue to keep the SDK 2.5 Software online.

What does it contain (small and reduced reference - from the website already mentioned):

It contains several documentation about the RCX2 byte codes and Spybotics and LASM, as well as documents, libraries and header files for communications between PC and block. It also includes RCX2 firmware (firm0328.lgo) that gives the RCX more capacity (even in older versions).It has the VLLtest VCTest and VBTest executables and the ScripEd tool, which allows the programming of RCX2, Scout, MicroScout and Spybot.

However, as there are interested programmers, here is the link to download it.


A imagem que se segue reproduz o conteúdo do ficheiro readme.

The following image reproduces the contents of the readme file.


quinta-feira, 16 de abril de 2020

O RCX : aspectos técnicos... (parte II)

O RCX ( Robotic Command System), o primeiro robot comercializado da LEGO Group em 1998, foi lançado em duas variáveis comerciais: a educativa e a de uso doméstico/individual, ambas da linha LEGO® MINDSTORMS®  (Mindstorms for Schools e Mindstorms, respetivamente).
A vertente educativa (primeiro LEGO® Dacta e depois LEGO® Education ), estava associada a uma linha denominada ROBOLAB (nome do programa que o monitorizava). Foi inicialmente vendido à parte numa simples caixa (9709).


RCX (Robotic Command System), the first commercialized robot from the LEGO Group in 1998, was launched in two commercial variables: educational and domestic / individual, both from the LEGO® MINDSTORMS®  line (Mindstorms for Schools and Mindstorms, respectively) .

The educational aspect (first LEGO® Dacta and then LEGO® Education ), was associated with a line called ROBOLAB (name of the program that monitored it). It was initially sold separately in a simple box (9709).


folheto inserto na caixa 9709
(4.122.204)


Posteriormente foram lançados vários sets que incluíam o RCX como parte integrante (ver grelha mais abaixo).
A vertente de uso doméstico/individual, denominada Robotics Invention System (RIS), foi paralelamente lançada e teve sempre o RCX incluído nos seus 3 conjuntos base. 
Ambas valências usavam o mesmo RCX, mas com software diferente (o RIS com o software RCX Code).
O RCX em si sofreu alterações durante os anos em que foi fabricado (1998 a 2004),. Assim existiram 3 versões, a saber: 
RCX 1.0 - O primeiro RCX possuía um adaptador que o ligava à corrente elétrica, apesar de possuir o modo de funcionamento a pilhas incorporado (6 pilhas AA). Esta ligação elétrica não carregava as pilhas caso estas fossem recarregáveis, unicamente substituía o fornecimento elétrico (das pilhas para o transformador externo);
RCX 1.0 versão 2, conhecido por RCX 1.5 - Este RCX é igual ao anterior mas já não possui a possibilidade de se ligar à eletricidade por meio de transformador. É conhecido por RCX 1.5 pois foi unicamente comercializado no set Robotics Invention System (RIS) 1.5;
RCX 2.0 - Último modelo do RCX, exteriormente idêntico ao RCX 1.5 (não possui ligação eléctrica externa), possui contudo uma alteração interna (única que se conhece)  na rádio frequência do sinal de infravermelhos. Esta alteração possibilitava a comunicação do RCX com outros robots da LEGO® entretanto comercializados como o Spybotics (ver outro post sobre este produto no separador outros robots neste blogue).
Apresento em baixo uma tabela com a indicação dos sets (educacionais ou não) que foram comercializados com este bloco programável.

Subsequently, several sets were launched that included the RCX as an integral part (see grid below).
The strand of household / individual use, called Robotics Invention System (RIS), was launched in parallel and always had the RCX included in its sets.
Both valences used the same RCX, but with different software (see future post).
The RCX itself underwent changes during the years it was manufactured (1998 to 2004). So there were 3 versions, namely:
RCX 1.0 - The first RCX had an adapter that connected it to the mains, despite having the built-in battery operation (6 AA batteries). This electrical connection did not charge the batteries if they were rechargeable, it only replaced the electrical supply (from the batteries to the external transformer);
RCX 1.0 version 2, known as RCX 1.5 - This RCX is the same as the previous one but no longer has the possibility of being connected to electricity by means of a transformer. It is known as RCX 1.5 because it was only sold in the Robotics Invention System (RIS) 1.5 set;
RCX 2.0 - Latest model of the RCX, externally identical to the RCX 1.5 (does not have an external electrical connection), however it has an internal change (the only one known) in the radio frequency of the infrared signal. This change allowed the RCX to communicate with other LEGO®  robots meanwhile marketed as Spybotics (see another post about this product in the other robots tab in this blog).
Below is a table indicating the sets (educational or not) that were sold with this programmable block.


Sobre o seu firmware e modo de configuração consulte o Mindstorms SDK 2.5 (clique aqui).

About your firmware and configuration mode see the Mindstorms SDK 2.5 (click here).

quarta-feira, 18 de março de 2020

O Micro Scout - LEGO® MindStorms® 9748 (1999) e 9754 (2000).

Baseados na saga Star Wars, a LEGO Group lançou em 1999 primeiramente o Droid Developer Kit (set 9748) e posteriormente o Dark Side Developer Kit (set 9754).
Embora sendo o Micro Scout um robot da série MINDSTORMS® , apresenta fortes alterações ao RCX base desta série.
Este hub não possui qualquer porta de ligação in ou out, ao contrário do RCX que possui 3 portas in e 3 portas out, bem como um leitor e emissor de infravermelhos. O Microscout possui um motor incorporado bem como um sensor de luz. Vem programado com 7 programas e um outro extra denominado P.
Em baixo as caixas originais dos dois sets (entre ambas as edições japonesas). Mais abaixo as fotos das 3 edições deste hub o com base cinzenta escura, com duas versões uma branca/azul no topo e outra cinzenta clara/vermelha (32344c01) e o com base preta (32344c02).

Based on the Star Wars saga, in 1999 the LEGO Group first launched the Droid Developer Kit (set 9748) and later the Dark Side Developer Kit (set 9754).
Although the Micro Scout is a robot from the MINDSTORMS® series, it presents strong changes to the base RCX of this series.
This hub does not have any in or out connection port, unlike the RCX which has 3 in and 3 out ports, as well as an infrared reader and emitter. Microscout has a built-in motor as well as a light sensor. It comes with 7 programs and an extra one called P.
Below are the original boxes of the two sets (between both the Japanese edition). Below are the photos of the 3 editions of this hub: the one with a dark gray base, with two versions, a white / blue one on the top and a light gray / red one (32344c01) and the one with a black base (32344c02).


9748 - Droid Developer Kit
em cima a versão original e em baixo a versão japonesa.


9754 - Dark Side Developer Kit, 
em cima a versão original e em baixo a versão japonesa.


Coloco a seguir as imagens das construções base destes dois conjuntos. Do conjunto  Droid Developer Kit 9748 (embora no CD-ROM que o acompanha dê a possibilidade de construir outros, em nível avançado):

Below are images of the basic constructions of these two sets. From the Droid Developer Kit 9748 (although the accompanying CD-ROM gives you the possibility to build others, at an advanced level):


R2-D2 Astromech Droid


L-3GO Trainer Droid


Jedi Knight Droid


Do conjunto Dark Side Developer Kit 9754:

From the Dark Side Developer Kit 9754 set:


L-8GO Navigator


Droid Starfighter


Sith Lord


Stepper


X-Walker


AT-AT

Este conjunto (9748) permite que construa pequenos robôs controlados pelo Micro Scout, um hub com sensor luz, motor e um sistema de controle. Um CD-ROM acompanha a caixa.
Três níveis de construção estão programados : Jedi Aprendiz, Jedi Knight e Jedi Master. No Jedi Aprendiz o manual (em papel ou CD-ROM) permite-nos construir passo a passo o robô de nossa escolha: R2-D2 ou L-3GO, criação original do LEGO® . No Jedi Knight, as instruções permitem que você construa um tipo de veículo equipado com um tenaz na frente. É aconselhável fazer melhorias ou simplesmente personalizar um pouco o droid. No nível Jedi Master, não há mais instruções: o jogador pode dar liberdade à sua imaginação! O CD-ROM dá alguns conselhos (e imagens preciosas) para construir outros droids: submarino Gungan, peixe gigante ou dróide de combate em seu STAP, mas para tal é será necessário trabalhar a partir de imagens para reproduzir o resultados propostos pela LEGO®  ...

O Micro Scout contém sete programas diferentes (no fim deste post pode visualizar um vídeo retirado do CD_ROM, com a totalidades destes programas aplicado ao robot L-3GO):
1 - Marcha atrás;
2 - Marcha atrás e depois marcha em frente;
3 - Marcha atrás e, se deteta luz no seu sensor frontal,  marcha em frente;
4 - Se a luz for detectada, marcha em frente.  Se a luz estiver apagada e for ligada novamente, faz marcha atrás e depois para a frente.
5 - Se a luz for detectada, depois perdida (ou desligada) e depois redetectada, anda cada vez mais rápido para a frente.
6 -  Se a luz mudar, faz marcha em frente e depois inverte o sentido.
7 - O Micro Scout emite um código sonoro. Se o código (sequência de sons em luz) for reproduzido corretamente com uma lanterna, vai para a frente. Caso contrário, faz marcha atrás.
Em baixo segue o link para o livro e para o CD_ROM que acompanha este kit.

This set (9748) allows you to build small robots controlled by Micro Scout, a hub with light sensor, motor and a control system. A CD-ROM is included in the box.
Three levels of construction are scheduled: Jedi Apprentice, Jedi Knight and Jedi Master. In Jedi Apprentice the manual (on paper or CD-ROM) allows us to build step by step the robot of our choice: R2-D2 or L-3GO, original LEGO®  creation. In the Jedi Knight, the instructions allow you to build a vehicle type equipped with a tongs at the front. It is advisable to make improvements or simply customize the droid a little. At the Jedi Master level, there are no further instructions: the player can give freedom to their imagination! The CD-ROM gives some advice (and precious images) to build other droids: Gungan submarine, giant fish or combat droid in your STAP, but for that it will be necessary to work with images to reproduce the results proposed by LEGO®  .. 


Micro Scout contains seven different programs (at the end of this post you can view a video taken from CD_ROM, with the totality of these programs applied to the L-3GO robot):
1 - Reverse gear;
2 - March backwards and then march forward;
3 - Reverse and, if light is detected on your front sensor, go forward;
4 - If the light is detected, move forward. If the light is off and turned on again, reverse and then forward.
5 - If the light is detected, then lost (or turned off) and then redetected, it moves faster and faster forward.
6 - If the light changes, go forward and then reverse the direction.
7 - The Micro Scout emits a sound code. If the code (sequence of sounds in light) is correctly reproduced with a flashlight, it moves forward. Otherwise, reverse.
Below is the link to the book and CD_ROM that comes with this kit.


(clique na imagem para fazer download) 


O conjunto (9754) permite que se construa pequenos robôs controlados pelo Micro Scout, um hub com sensor luz, motor e um sistema de controle.
Três níveis de construção estão programados : Sith Aprendiz, Sith Senhor e Sith Master. No Sith Aprendiz o manual permite-nos construir passo a passo o nossos primeiros robots: O maléfico L-8GO, uma criação original do LEGO®, depois o um Droid Caçador em posição de marcha. No  Sith Senhor, as instruções permitem que você construa Droidekas e depois dois droid caminhantes criado pela LEGO: o Stepper e o X-Walker. Estes últimos robots podem ser amplamente personalizados.
No nível Sith Master, as istruções permitem construir a construção mais importante deste set : o terrível AT-AT ! Por fim, com algumas indicações podemos construir um AAT bem como uma criatura de Naboo.

O Micro Scout contém sete programas diferentes:
1 - Marcha atrás;
2 - Marcha atrás e depois marcha em frente;
3 - Marcha atrás e, se deteta luz no seu sensor frontal,  marcha em frente;
4 - Se a luz for detectada, marcha em frente.  Se a luz estiver apagada e for ligada novamente, faz marcha atrás e depois para a frente.
5 - Se a luz for detectada, depois perdida (ou desligada) e depois redetectada, anda cada vez mais rápido para a frente.
6 -  Se a luz mudar, faz marcha em frente e depois inverte o sentido.
7 - O Micro Scout emite um código sonoro. Se o código (sequência de sons em luz) for reproduzido corretamente com uma lanterna, vai para a frente. Caso contrário, faz marcha atrás.
Em baixo segue o link para o livro (conjunto de 3) que acompanha este kit.


The set (9754) allows the construction of small robots controlled by Micro Scout, a hub with light sensor, motor and a control system.
Three levels of construction are scheduled: Sith Apprentice, Sith Lord and Sith Master. In the Sith Apprentice, the manual allows us to build our first robots step by step: the evil L-8GO, an original LEGO® creation, then the Droid Hunter in walking position. In Sith Sir, the instructions allow you to build Droidekas and then two walker droid created by LEGO: the Stepper and the X-Walker. These latter robots can be widely customized.
At the Sith Master level, instructions allow you to build the most important construction of this set: the terrible AT-AT! Finally, with some pointers we can build an AAT as well as a Naboo creature.

Micro Scout contains seven different programs:

1 - Reverse gear;
2 - March backwards and then march forward;
3 - Reverse and, if light is detected on your front sensor, go forward;
4 - If the light is detected, move forward. If the light is off and turned on again, reverse and then forward.
5 - If the light is detected, then lost (or turned off) and then redetected, it moves faster and faster forward.
6 - If the light changes, move forward and then reverse the direction.
7 - The Micro Scout emits a sound code. If the code (sequence of sounds in light) is correctly reproduced with a flashlight, it moves forward. Otherwise, reverse.
Below is the link to the book (set of 3) that comes with this kit


9754 - os 3 livros de instruções

Outros aspectos sobre o Micro Scout

Aprsento aqui outra informação adicional a estes kits, as quais necessitei no meu percurso de utilização.
Em primeiro lugar, dado o avançado estado de uso de alguns destes robots, e eventualmente por descuido ( deixar as pilhas - 2 AA) dentro do compartimento, estas criam um depósito que corrói as ligações elétricas, nomeadamente junto ao pólo negativo.
Pessoalmente, e porque comprei um destes sets em segunda mão, tive de recuperar o Micro Scout, pois o mesmo apresentava a característica de intermitência no seu desempenho, devido à oxidação interna. Desmontei-o quase completamente e limpei as partes oxidadas. "Resoldei" por fim o terminal do pólo negativo.
Apresento aqui uma imagem de um site onde se refere a reparação. Contudo, pessoalmente não desmontei completamente o Micro Scout (não o separei da base cinzenta escura, pois teria uma reparação algo demorada e difícil) e depois de o limpar cuidadosamente voltei a soldar o pólo negativo (na imagem assinalo com uma sete a parte onde soldei).
A primeira imagem mostra os constituintes internos do Micro Scout. a segunda o ponto onde soldei (as imagens não são da minha autoria - provêm de um site - clique aqui). No fim deste post apresento um vídeo do meu robot em movimento depois de reparado.


In this post I put other additional information to these kits, which I needed in my course of use.
First of all, given the advanced state of use of some of these robots, and eventually due to carelessness (leaving the batteries - 2 AA) inside the compartment, they create a deposit that corrodes the electrical connections, namely near the negative pole.
Personally, and because I bought one of these sets second-hand, I had to recover the Micro Scout, as it had a flashing feature in its performance, due to internal oxidation. I took it apart almost completely and cleaned the oxidized parts. I finally "solved" the negative pole terminal.
Here is an image of a website where the repair is concerned. However, personally I did not completely dismantle the Micro Scout (I did not separate it from the dark gray base, as it would take a long and difficult repair) and after carefully cleaning it, I soldered the negative pole again (in the image I mark the part where I soldered with a seven). ).

The first image shows the internal constituents of the Micro Scout. the second the point where I soldered (the images are not my own - they come from a website - click here). At the end of this post I present a video of my robot in motion after repair.


Sobre o modo P (power mode)

A LEGO®  sempre referiu que iria explicar a sua utilização no outono de 2000 no seu site dedicado ao MINDSTORMS®/Dark Side Developer. Contudo, segundo aficionados da LEGO®, tal não aconteceu na altura. 
A LEGO® disponibiliza então um conjunto de instruções/ferramentas de programação denominada LEGO Software Development Kit (SDK) cuja última versão é a 2.5 , a qual visou dar apoio técnico à utilização de software e programação entre vários robots da LEGO® , nomeadamente o RIS 2.0 e a sua torre USB, com o Scout e o Spybotics. 
Para quem queira saber mais faça o donwload no link acima ou visite a página de um grande investigador a nível individual nesta área - philohome.com.

Outros encetaram tentativas de programação no modo P utilizando para tal inputs de luz no Micro Scout. Usaram por referência o conhecimento obtido no modelo LEGO Technic 8479, o primeiro modelo controlado da LEGO através da leitura ótica de códigos de barras (imagens abaixo). A LEGO publicou online software para gerar e imprimir códigos de barras para controlar o 8479 (clique aqui para fazer download). O Scout possui uma VLL que possibilita este ser um intermediário na programação do MicroScout, em P mode.(nota posterior: o software ROBOLAB versão 2.9.4c possibilita tal através da programação do Scout e deste a programação do Microscout e do Code Pilot (ver página específica sobre ROBOLAB neste blog). Ver vídeo de experiência básica de comunicação VLL (ver mais abaixo). 

LEGO®  has always said that it would explain its use in the fall of 2000 on its website dedicated to mindstorms / Darl Side Developer. However, according to LEGO aficionados, this did not happen at the time.
LEGO®  then provides a set of instructions / programming tools called the LEGO Software Development Kit (SDK), the latest version of which is 2.5, which aimed to provide technical support for the use of software and programming between various LEGO®  robots, namely RIS 2.0 and your USB tower, with Scout and Spybotics.
For those who want to know more, download the link above or visit the page of a great individual researcher in this area - philohome.com.
Others initiated attempts at programming in P mode using light inputs in the Micro Scout. They used the knowledge obtained in the LEGO Technic 8479 model, the first controlled model from LEGO®  through optical bar code reading (images below) by reference. LEGO has published online software to generate and print barcodes to control the 8479 (click here to download)Scout has a VLL that allows it to be an intermediary in MicroScout programming, in P mode.(Later note: ROBOLAB software version 2.9.4c makes this possible by programming the Scout and then programming the Microscout and Code Pilot (see specific page on ROBOLAB in this blog). See video of basic VLL communication experience below. )


o conjunto 8479 - O conjunto com o code pilot


o cartão de programação


o software Codepilot


Vídeo de promoção comercial do code pilot


Um video de divulgação do conjunto base do 
Code Pilot - o 8479

Esta programação era feita através de ligação de luz visível (Visible Light Link (VLL), em inglês). Para quem quiser "mergulhar" neste mundo consulte o link (ainda em funcionamento) de elecbrick de Doug Eaton ou a página de um japonês denominda "The  Cave of Mindstorms" datada de 2004, o qual usa uma aplicação para controlar o Micro Scout com a torre USB do RIS 2.0.
Barnaby Walters possui uma experiência bem sucedida. O site PBrick (um ótimo site) refere a mesma experiência usando outro equipamento. Vale a pena passar os olhos por eles todos.

Outros ainda usaram os sinais de luz emitidos pelo Spybotics ( o qual pode ser controlado, com alguma eficácia, por um RCX, por robolab 2.9.4, ou até por programas com linguagens diversas, nomeadamente NQC). Em baixo vídeo do youtube sobre uma destas experiências.


This programming was done through a visible light link (Visible Light Link (VLL), in English). For those who want to "dive" in this world see the link (still working) by elecbrick by Doug Eaton or the page of a Japanese called "The Cave of Mindstorms" dated 2004, which uses an application to control the Micro Scout with the RIS 2.0 USB tower.
Barnaby Walters has a successful experience. The PBrick site (a great site) refers to the same experience using other equipment. It is worth looking through them all.

Still others used the light signals emitted by Spybotics (which can be controlled, with some efficiency, by an RCX, by robolab 2.9.4, or even by programs with different languages, namely NQC. In a low youtube video about one of these experiences.


(atualizada em 03-04-2025)

sábado, 5 de junho de 2021

Lego programável - Interfaces e pbricks - evolução cronológica


ano

referência

nome

imagem

variedades

1986

9750

Technic Control – Interface Box

 versão 1987

 Só eletricidade

1993

9751

Control Lab Serial Interface

 Só eletricidade

1995

9753

Technic Control Center I

Só pilhas

1996

9752

Technic Control Center II

Pilhas e eletricidade

1997

32021c01

Code Pilot

Só a pilhas

1998

9709

RCX 1.0

1.0

Pilhas e

eletricidade

1.0 só pilhas


2.0 só pilhas


1998

71797

Cybermaster

 Só a pilhas

1999

32104c01

Scout

 Só a pilhas

1999

32344c01

Microscout

Branco 

Cinzento


2002

4232c01

Spybotics

Azul

Verde

Vermelho

Violeta

Só a pilhas

2003

3173c01

Record and Play

 Só a pilhas

2006

53788

NXT

Branco 

Preto (poucas unidades)


2009

9581-1

Wedo 1.0

 Energia por USB

2013

95646c01

EV3

Pilhas ou bateria recarregável

2016

19071c01

Wedo 2.0

Pilhas ou bateria recarregável

2017

bb0894c01

Boost

Só a pilhas

2019

45601-1

Spike Prime

Só bateria recarregável

2020


2021

 67718c01


67351c01

Robot Inventor


Spike Essential


Só bateria recarregável


(atualizada em 02/04/2025)